---
title: Building an Image Classifier Using Pretrained Models With Keras
description: Deep-learning models are ideal candidates for building image classification
systems. In this article, we demonstrate how to leverage Keras and pre-trained image
recognition models to create an image classifier that identifies different Simpsons
characters.
author:
- Reece Stevens
topics:
- Software
needs_pigments: true
---
At Innolitics, we work in a wide variety of medical imaging contexts. Often in
our work with clients, we find that a decision has to be made based on
information encoded in an image or set of images. Depending on the type of
information we need, extracting meaning can be quite a difficult task to
automate. One instance where this happens frequently is in image
classification. For example, if a computer is given a picture of an animal, can
it tell if the picture is of a dog, cat, or bird? Although such a
classification is trivial for a human, an algorithmic approach can be hard to
define. This problem occurs frequently in medical contexts-- instead of
identifying animals, we can be identifying grid intersections in MRI phantoms
or distinguishing between different types of skin cancers. Classification
algorithms have traditionally relied upon carefully hand-crafted features to
identify images in such a manner. Thanks to advances in computational hardware
and the explosion of available digitized data, however, we now have another
option: we can train a deep neural network.
Deep neural nets are a powerful tool for solving previously intractable
problems; however, they require a large quantity of input data and considerable
processing power. The computational requirements of deep learning become
apparent when looking at industry-leading examples. The Google Brain team built
an image classifier model to compete in the [ImageNet Large Scale Visual
Recognition Challenge][imagenet], an image-recognition competition that attempts
to sort images into 1000 different categories of everyday objects. Their model,
[Inception v3][inception], is highly complex-- according to the GitHub
instructions for training the model from scratch, [it can take days to weeks
even with a multi-GPU hardware setup][inception-from-scratch]. If you don't have
access to a cluster of GPUs, that training time can jump even higher. The
hardware and time constraints of model training often serve as a significant
barrier to entry in the machine learning field.
That's where pre-trained models come in. Rather than attempt to train an entire
image recognition neural network, we instead stand on the shoulders of giants
and use networks trained by other research groups-- a technique called _transfer
learning_. It is possible for us to use portions of high-quality ImageNet models
to do the heavy lifting and help us create our own image classifier-- and this
task is made even easier with the help of [Keras][keras], a deep-learning
library for Python that makes creating and training models a breeze.
We'll sketch out the idea in code snippets, but in case
you want to skip to the punchline: [we've put the source code up on
GitHub.][source-code]
## The data
A deep-learning model is nothing without the data that trains it; in light of
this, the first task for building any model is gathering and pre-processing the
data that will be used. For this model, we will download a [dataset of Simpsons
characters from Kaggle][simpsons-kaggle]-- conveniently, all of these images
are organized into folders for each character.
### Preprocessing the dataset
There are two steps we'll take to prepare our dataset for model training.
Firstly, we will load the pixel data for all of the images into NumPy and
resize them so that each image has the same dimensions; secondly, we'll convert
the JPEG data into `*.npz` format for easier manipulation in NumPy.
```python
import os
import glob
import tqdm
import numpy as np
import scipy.ndimage
import scipy.misc
IMG_SIZE = (256, 256)
for image_path in tqdm.tqdm(list(glob.glob('simpsons_dataset/**/*.jpg'))):
image_pixels = scipy.ndimage.imread(image_path)
resized_image_pixels = scipy.misc.imresize(image_pixels, IMG_SIZE)
image_basepath, _ = os.path.splitext(image_path)
np.savez(image_basepath+'.npz', pixels=resized_image_pixels)
```
After we normalize the image dimensions, our next task is to partition the
dataset into training, validation, and testing sets. These terms sometimes have
different definitions depending on what your source is; for this article, we
define the terms in the following way: _Training_ data is used during the
training of the model; _validation_ data is used to calculate model loss, which
guides weight selection during training and helps detect if we are overfitting
the training set; and _testing_ data is used at the end of training to determine
if we have overfit our validation set. We'll partition the dataset into 70%
training, 20% validation, and 10% testing data.
When passing data into Keras, it is helpful to define an interface layer that
abstracts away some of the implementation details. The first abstraction will
be encoding the character names in the dataset: our names for characters
(`homer_simpson`, `marge_simpson`, etc.) must be translated into a vector of
boolean values for the model. We define a simple class to expose `one_hot_*`
operations that make this easier:
```python
class DataEncoder():
def __init__(self, all_character_names):
self.all_character_names = all_character_names
def one_hot_index(self, character_name):
return self.all_character_names.index(character_name)
def one_hot_decode(self, predicted_labels):
return dict(zip(self.all_character_names, predicted_labels))
def one_hot_encode(self, character_name):
one_hot_encoded_vector = np.zeros(len(self.all_character_names))
idx = self.one_hot_index(character_name)
one_hot_encoded_vector[idx] = 1
return one_hot_encoded_vector
```
Aside from encoding data, we can also provide a layer for partitioning the data
into training, validation, and testing sets. This layer will feed the
appropriate data into the model during training by using generators:
```python
class DataGenerator():
def __init__(self, data_path):
self.data_path = data_path
self.partition2character2npz = {
'train': defaultdict(list),
'validation': defaultdict(list),
'test': defaultdict(list),
}
self.all_character_names = set()
npz_file_listing = list(glob.glob(os.path.join(data_path, '**/*.npz')))
for npz_path in npz_file_listing:
character = os.path.basename(os.path.dirname(npz_path))
self.all_characters.add(character)
if hash(npz_path) % 10 < 7:
partition = 'train'
elif 7 <= hash(npz_path) % 10 < 9:
partition = 'validation'
elif 9 == hash(npz_path) % 10:
partition = 'test'
else:
raise Exception("partition not assigned")
self.partition2character2npz[partition][character].append(npz_path)
self.encoder = DataEncoder(sorted(list(self.all_characters)))
def _pair_generator(self, partition, augmented=True):
partition_data = self.partition2character2npz[partition].items()
while True:
for character, npzs in partition_data:
npz_path = random.choice(npzs)
pixels = np.load(npz_path)['pixels']
one_hot_encoded_labels = self.encoder.one_hot_encode(character)
if augmented:
augmented_pixels = next(
image_datagen.flow(np.array([pixels]))
)[0].astype(np.uint8)
yield augmented_pixels, one_hot_encoded_labels
else:
yield pixels, one_hot_encoded_labels
def batch_generator(self, partition, batch_size, augmented=True):
while True:
data_gen = self._pair_generator(partition, augmented)
pixels_batch, one_hot_character_batch = zip(
*[next(data_gen) for _ in range(batch_size)]
)
pixels_batch = np.array(pixels_batch)
one_hot_character_batch = np.array(one_hot_character_batch)
yield pixels_batch, one_hot_character_batch
```
The `batch_generator` method will allow us to pass in batches of data to the
model during training without having to load it all into memory at once. Since
we're dealing with large quantities of input data, this is very helpful. With
this infrastructure in place, we are almost ready to begin building our model!
### Augmenting the dataset
As mentioned earlier, having enough input image data is often a major issue in
building a deep learning model. Sometimes a dataset is too small, and the model
cannot learn enough about the problem to accurately classify images. Other
times, a dataset does not have enough variance in its input or the model is too
complex and _overfitting_ can result-- teaching a model to classify images
based on irrelevant features that happened to be present throughout the
training set. One of our engineers once observed that in the comparison of
machine learning to human learning, overfitting is a lot like superstition:
just because you had a bad day after you walked under a ladder one time doesn't
mean that walking under a ladder produces bad luck.
Under- and overfitting are common issues in machine learning that we will
explore in more detail in a later article. While underfitting usually indicates
that a larger or more complex model is needed, overfitting can often be
mitigated by increasing your input data volume and variance. One data
processing step that can help do that is _data augmentation_, algorithmically
generating new input data based on your dataset. Keras provides some very
convenient data augmentation functionality in the `ImageDataGenerator` class:
```python
from keras.preprocessing.image import ImageDataGenerator
image_datagen = ImageDataGenerator(
rotation_range=15,
width_shift_range=.15,
height_shift_range=.15,
shear_range=0.15,
zoom_range=0.15,
channel_shift_range=1,
horizontal_flip=True,
vertical_flip=False,
)
```
This class performs various random transformations on an input image to augment
the data used to train your network. This can help prevent overfitting by
distorting the image and thus encouraging the model to focus on what you are
trying to classify rather than on environmental features.
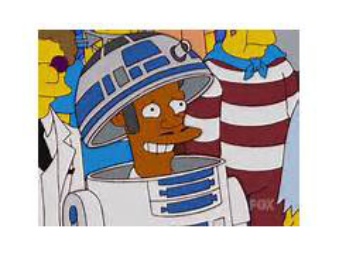
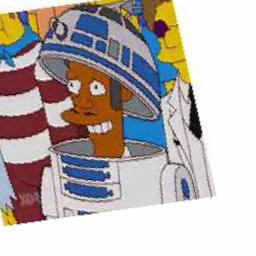
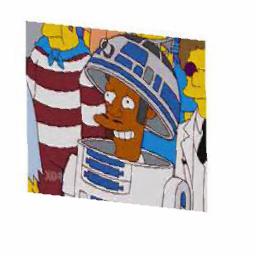
Examples of image augmentation transformations supplied by Keras.
## The model
After acquiring, processing, and augmenting a dataset, the next step in
creating an image classifier is the construction of an appropriate model. In
Keras, it is simple to create your own deep-learning models or to modify
existing ImageNet models. It's so simple, in fact, that we will build a model
generator that can pick five different models for its basis!
```python
import keras
from keras.layers.core import Dense, Flatten, Dropout
from keras.layers.normalization import BatchNormalization
from keras.models import Model
from keras.applications.inception_v3 import InceptionV3
from keras.applications.xception import Xception
from keras.applications.resnet50 import ResNet50
from keras.applications.vgg19 import VGG19
IMG_SIZE = (256, 256)
IN_SHAPE = (*IMG_SIZE, 3)
def get_model(pretrained_model, all_character_names):
if pretrained_model == 'inception':
pretrained_model = InceptionV3(
include_top=False,
input_shape=IN_SHAPE,
weights='imagenet'
)
elif pretrained_model == 'xception':
pretrained_model = Xception(
include_top=False,
input_shape=IN_SHAPE,
weights='imagenet'
)
elif pretrained_model == 'resnet50':
pretrained_model = ResNet50(
include_top=False,
input_shape=IN_SHAPE,
weights='imagenet'
)
elif pretrained_model == 'vgg19':
pretrained_model = VGG19(
include_top=False,
input_shape=IN_SHAPE,
weights='imagenet'
)
elif pretrained_model == 'all':
input = Input(shape=IN_SHAPE)
inception_model = InceptionV3(
include_top=False,
input_tensor=input,
weights='imagenet'
)
xception_model = Xception(
include_top=False,
input_tensor=input,
weights='imagenet'
)
resnet_model = ResNet50(
include_top=False,
input_tensor=input,
weights='imagenet'
)
flattened_outputs = [Flatten()(inception_model.output),
Flatten()(xception_model.output),
Flatten()(resnet_model.output)]
output = Concatenate()(flattened_outputs)
pretrained_model = Model(input, output)
# ... Continued
```
We can select from `inception`, `xception`, `resnet50`, `vgg19`, or a
combination of the first three as the basis for our image classifier. We
specify `include_top=False` in these models in order to remove the top level
classification layers. These are the layers used to classify images into the
categories of the ImageNet competition; since our categories are different, we
can remove these top layers and replace them with our own.
```python
# def get_model(pretrained_model, all_character_names) continued...
if pretrained_model.output.shape.ndims > 2:
output = Flatten()(pretrained_model.output)
else:
output = pretrained_model.output
output = BatchNormalization()(output)
output = Dropout(0.5)(output)
output = Dense(128, activation='relu')(output)
output = BatchNormalization()(output)
output = Dropout(0.5)(output)
output = Dense(len(all_character_names), activation='softmax')(output)
model = Model(pretrained_model.input, output)
for layer in pretrained_model.layers:
layer.trainable = False
model.summary(line_length=200)
model.compile(optimizer='adam',
loss='categorical_crossentropy',
metrics=['accuracy'])
return model
```
In just a few lines of code, we have taken an existing deep learning model,
thrown away the top layer, and attached our own set of densely connected neural
layers. Although an in-depth discussion of what these layers are is beyond the
scope of this article, you can read more about the [different activation
functions here][activation-fcns]. The takeaway from this setup, though, is that
the last layer must specify the classification of the image. Therefore, it will
be of the size `len(all_character_names)`, one output for each possible
character.
After we construct our layers and ensure our output is the correct size, we
freeze the pre-trained layers of the model so that we don't modify them during
training. Once this is done, we can compile the model and begin training.
## Training the model
Now that we've prepared our data and constructed our model, it's time to train.
After setting up a TensorBoard callback hook and specifying that we want to
save the best model weights after training, we can hook up our data and let the
training begin. We set this up as a Python command line application to make
initiating training simple:
```python
import argparse
BATCH_SIZE = 64
MODELS = {
'inception',
'xception',
'resnet50',
'vgg19',
'all'
}
if __name__ == '__main__':
parser = argparse.ArgumentParser()
parser.add_argument('--pretrained_model', choices=MODELS)
parser.add_argument('--data-dir', required=True)
parser.add_argument('--weight-directory', required=True,
help="Directory containing the model weight files")
parser.add_argument('--tensorboard-directory', required=True,
help="Directory containing the Tensorboard log files")
parser.add_argument('--epochs', required=True, type=int,
help="Number of epochs to train over.")
args = parser.parse_args()
tensorboard_callback = keras.callbacks.TensorBoard(
log_dir=args.tensorboard_directory,
histogram_freq=0,
write_graph=True,
write_images=False
)
save_model_callback = keras.callbacks.ModelCheckpoint(
os.path.join(args.weight_directory, 'weights.{epoch:02d}.h5'),
verbose=3,
save_best_only=False,
save_weights_only=False,
mode='auto',
period=1
)
data_generator = DataGenerator(args.data_dir)
model = get_model(
args.pretrained_model,
data_generator.encoder.all_character_names
)
model.fit_generator(
data_generator.batch_generator('train', batch_size=BATCH_SIZE),
steps_per_epoch=200,
epochs=args.epochs,
validation_data=data_generator.batch_generator(
'validation',
batch_size=BATCH_SIZE,
augmented=False
),
validation_steps=10,
callbacks=[save_model_callback, tensorboard_callback],
workers=4,
pickle_safe=True,
)
```
There are three terms used to describe how data is used during training:
- _Batches_ are groups of images fed into the model per step
- _Steps_ are the number of batches per epoch
- _Epochs_ are typically defined as the number of iterations through a dataset.
In this case, we are bending the rules a bit and defining epochs as the number
of batches before the callback functions are executed.
In this case, we set our batch size and number of steps so that epoch updates
happen somewhat frequently during training. Every time an epoch finishes, the
callback methods are updated, so we can watch the model on TensorBoard and save
the weights from the best iterations.
Once training begins, feel free to go get a coffee, pick up some groceries,
[have a foam sword battle with a coworker][xkcd-compiling]... it's going to
take quite a long time to train. Even when training an image classifier on a
GPU, it can still take several hours.
## Predicting with the model
Now that the model has been completely trained, it's time to use it to predict
the character names of new images. This is very simple to do with Keras:
```python
predicted_labels = model.predict(pixels, batch_size=1)
```
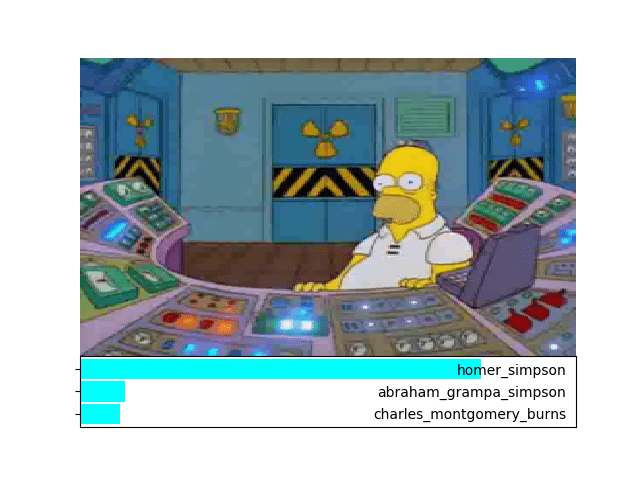
In a single line of code, we can use our model to predict what Simpsons
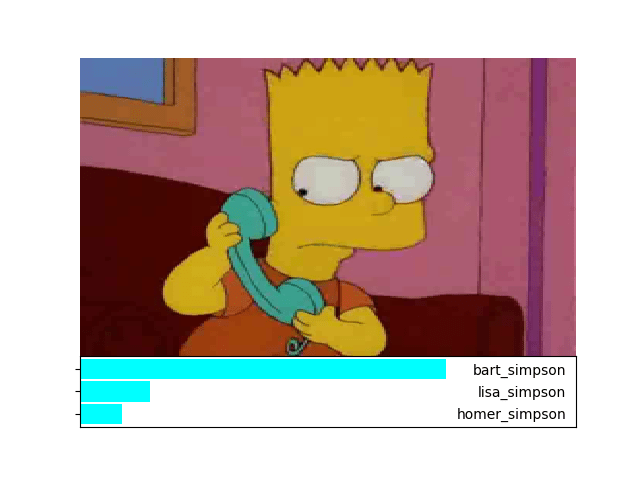
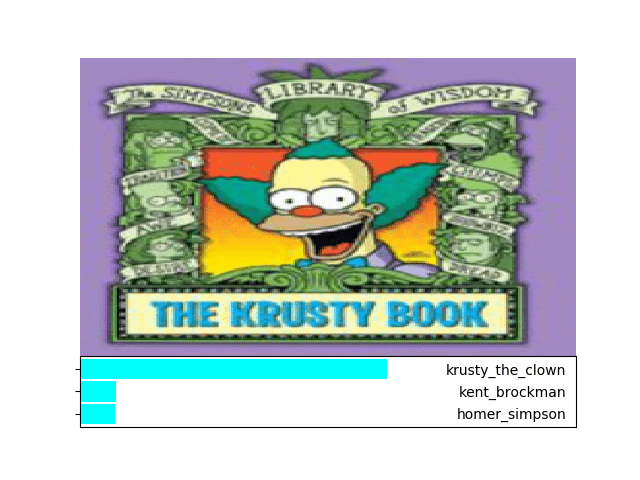
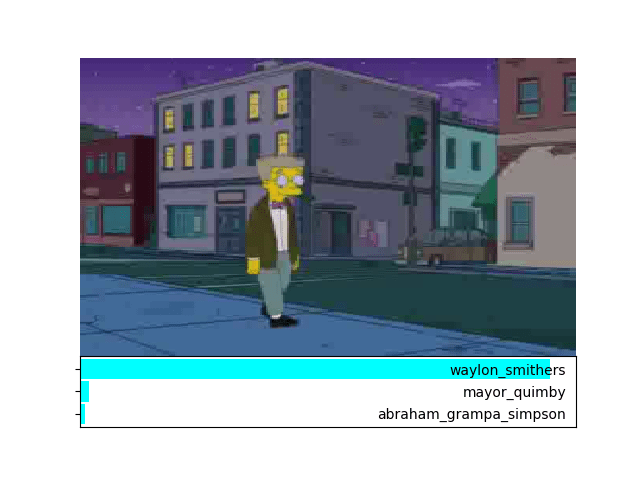
character is present in the image. We can run some data through the model to
verify that it does what we expect (histograms added by us):
And indeed, it looks like our image classifier is correctly classifying
Simpsons characters in the input images!
# Conclusion
With minimal overhead, we were able to take advantage of highly complex
ImageNet machine learning models and develop our own image classifier. Although
there is still much to explore and improve upon with our model, it can serve as
a foundation for solving complex image classification problems with relatively
high accuracy. If you want to run the examples for yourself, [check out the
source code on GitHub][source-code]!
Now that the image classifier is working, we will investigate how to analyze
its behavior and debug error cases [in our next blog post][next-post].
[imagenet]: http://image-net.org/challenges/LSVRC/2016/index
[inception]: https://www.kaggle.com/google-brain/inception-v3
[inception-from-scratch]: https://github.com/tensorflow/models/tree/master/research/inception#how-to-train-from-scratch
[keras]: https://keras.io/
[source-code]: https://github.com/innolitics/pre-trained-keras-example
[simpsons-kaggle]: https://www.kaggle.com/alexattia/the-simpsons-characters-dataset
[activation-fcns]: https://github.com/Kulbear/deep-learning-nano-foundation/wiki/ReLU-and-Softmax-Activation-Functions
[xkcd-compiling]: https://www.xkcd.com/303/
[next-post]: https://innolitics.com/10x/visualizing-image-classification/